.webp)


Power on
Generate & share a secure link and anyone can view the live timer on their device. Producers, stage managers, and remote crew can monitor timing instantly from anywhere while your controls remain fully protected.
No hardware. No installs. Just a live window into the show.
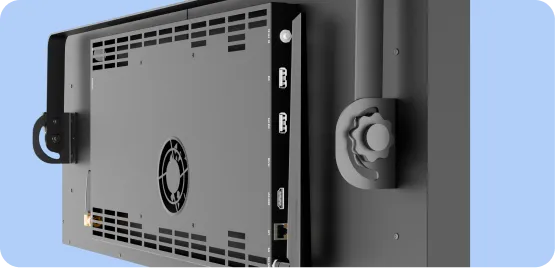
Plug in your CueTime™ Display
.webp)
Switch the power button ON

Wait for the home screen to appear
Power on
DO NOT CONNECT BOTH POWER INPUTS AT THE SAME TIME.
Connecting TRUECON and IEC simultaneously can cause electrical damage and void your warranty.
Use only one power input source at a time.
Connecting Your Device
You can connect to your CueTime™ Display in three different methods, depending on your setup needs:
Hotspot Mode
Best for fast setups or when no Wi-Fi is available.
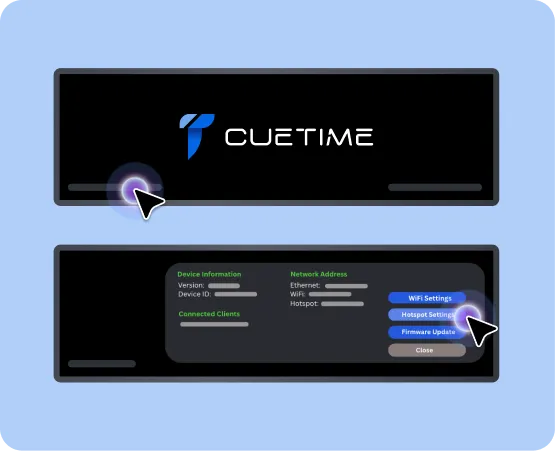
Tap 3 times at the bottom left of the screen where it shows Version. Tap on “Hotspot Settings” button.
.webp)
On your controlling device (phone, tablet, laptop), open Wi-Fi settings & connect to that SSID.
Open the CueTime app & go to Devices. Your display will appear under Known Devices.
.webp)
Tap the display name & the screen will generate an OTC (One Time Code) to claim the screen.
.webp)
On your controlling device (phone, tablet, laptop), open Wi-Fi settings & connect to that SSID.
.webp)
The display should now appear under Connected Devices and your home screen will have a green icon next to logo signaling a connection is established.
Online Mode
Best for sharing timers with remote team members or when others need to track the countdown off-site.
First, connect your CueTime screen to a Wi-Fi network.
.webp)
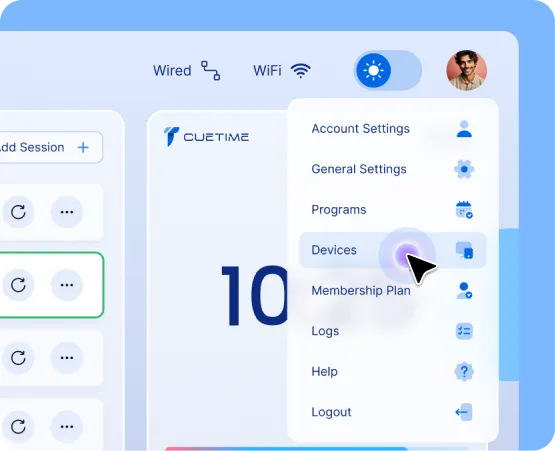
In the app, go to Devices & tap Online Mode.
.webp)
The screen will generate a unique online code.
.webp)
Share this code with your controlling device (or with others who need access).
Enter the code into the app & your device will connect to the screen online.
Pro Tip
You can switch between connection modes depending on your environment. For example, use Hotspot Mode for rehearsals (close ranges), Wi-Fi Mode during live events with multiple CueTime™ screens, and Online Mode forremote collaborators.
Connecting Multiple Devices
Option A
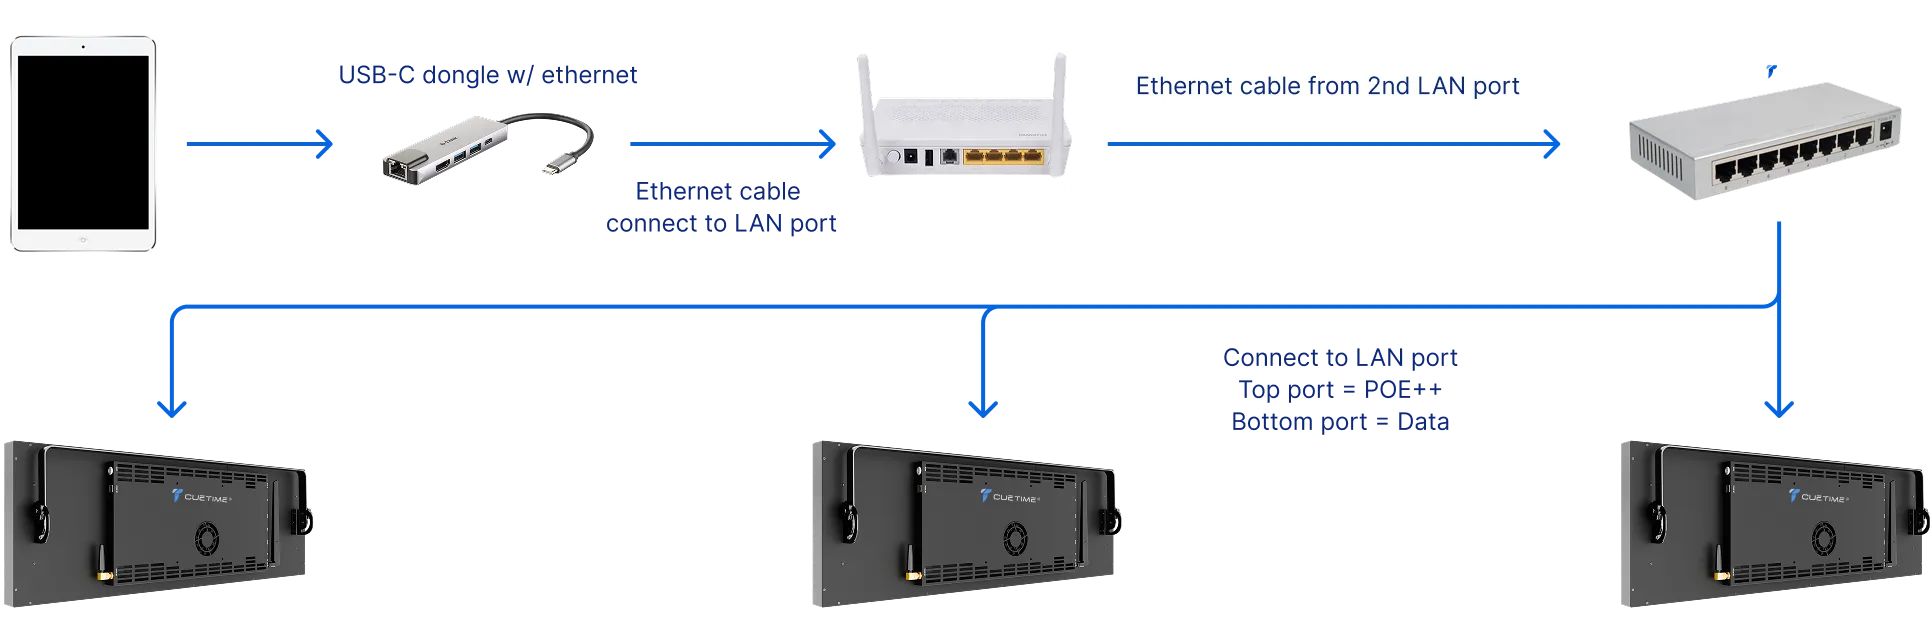
Hardwired (recommended): Use Ethernet cables to connect each CueTime Display to anetwork switch or travel router. Connect your control device to the same switch or router. Once on the same network, all displays can be discovered and controlled from the CueTime app
Option B
Wi-Fi: Connect all CueTime Displays and your control device to the same Wi-Fi network.
Option c
You can connect one screen to another screen’s hotspot and be able to control multiplescreens that way as well.
Direct Ethernet Connection
Single Screen
CueTime™ is designed with security and reliability in mind. The claiming process ensures that yourtimer is always protected and free from interference

Multiple Screen
CueTime™ is designed with security and reliability in mind. The claiming process ensures that yourtimer is always protected and free from interference
Claiming & Security Logic
CueTime™ is designed with security and reliability in mind. The claiming process ensures that yourtimer is always protected and free from interference
Why this matters
- Prevents accidental claims by other devices
- Ensures show reliability your timer won’t be disrupted
- Provides a smooth recovery path if your controlling device fails
When you add your CueTime™ Display in the app under Devices tab, the screen generates a One TimeCode (OTC). This is part of the claiming process.
.webp)
Once you enter the code in the appcc, your controlling device claims the screen and is successfullyconnected.
.webp)
After a screen is claimed, no other device can claim it — preventing unwanted interference.
Device Disconnection & Recovery
In the event your controlling device disconnects whether from low battery, app crash, loss of Wi-Fi,or system freeze — the CueTime™ screen will continue running the active timer withoutinterruption.
Regaining Control:
- Reconnect or use a different device.
Battery or Device Failure:
- If you attempt to re-connect with a different user account (different login credentials to the app), the screen will deny the claim. This is because of security measures put in place to ensure a safe transition between controlling devices.
- To transfer control from one device to another voluntarily, disconnect from the display by going to Devices and disconnecting from the display. The timer will keep running uninterrupted, and another device (with the same or different account) can then claim the screen by generating a new OTC (One Time Code).
Account Security:
- If you attempt to connect with a different user account, the screen will not allow you to claim it
- To transfer control voluntarily, disconnect from the display. The timer keeps running uninterrupted, andanother account can then claim the screen by generating a new secure code
Troubleshooting
No device found?
Refresh or confirm you’re on the same Wi-Fi/hotspot.
Code not working?
Tap Retry to generate a new code.
Offline
CueTime™ works without internet in hotspot or wired connection.
Wired connection requires a router or network switch.
Find Your Display
Open the CueTime app > Go to Devices tab > Your CueTime Display will appear under Known Devices
.webp)
If your device lost power, plug it in and reopen the CueTime™ app. Alternatively, open the CueTime™ app on another device.
.webp)
Your previously connected screen will appear in the list. If you do not see your device, make sure you are on the same network as the display.
.webp)
If you log in with the same user account, CueTime™ will recognize you automatically andrestore full control of the screen.
.webp)
You’ll need to generate a new One-Time Code (OTC) code on the screen to claimcontrol.
Why it works this way
This logic ensures your show remains protected and uninterrupted.
- If you attempt to connect with a different user account, the screen will not allow you to claim it
- To transfer control voluntarily, disconnect from the display. The timer keeps running uninterrupted, andanother account can then claim the screen by generating a new secure code
Result
consistent, secure, and fail-safe timer control — even during unexpected device issues.
UI Dashboard Overview
The CueTime™ app dashboard is divided into four main widgets to help you run your show smoothly
Top Left – Sessions
.webp)
Add or edit timers for each session
.webp)
The active timer is highlighted in green for easy visibility
.webp)
Each timer shows its activation time, so you know whether you are on schedule or behind.
.webp)
Tap "Add new session" to insert another segment into your rundown anytime.
.webp)
Save your latest changes across all connected devices with one tap.
Bottom Left – Messages
.webp)
Open Messages in the CueTime app and tap add message
.webp)
Use the Flash button above the widget to flash the message. This helps in getting the speakers attention.
.webp)
Tap Hide to exit message mode and return to the timer. (When message is selected, it takes priority overtimer. You must hide the message in order for the timer to be visible to the speaker.)
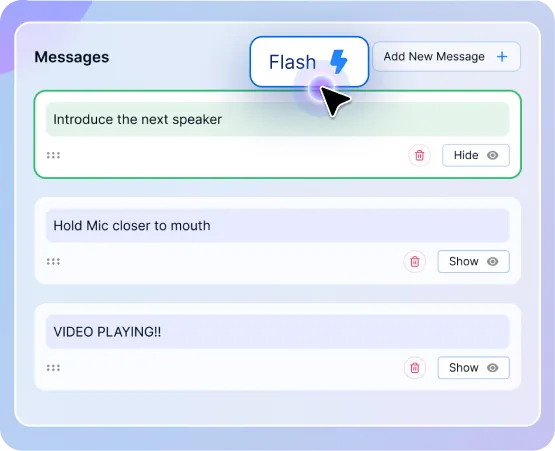
Tap Flash again to stop flashing but keep the message visible.
.webp)
Messages let you communicate discreetly with presenters without disrupting their flow.
Top Right – View Window
.webp)
Displays the current timer in large format. This is the presenter’s main view for staying on track.
.webp)
Shows details such as speaker name, session title, and progress bar.
.webp)
Once the time is up, then the timer turns red. Screen pulses. Presenter knows to wrap.
Bottom Right – Control Center
.webp)
Use Play or Pause to start or stop the current timer, or tap Skip to Next or to Previous to move between sessions.
.webp)
Adjust time dynamically by adding or subtracting minutes/seconds.
.webp)
Toggle Blackout to blank the screen, or Glow to subtly cue the presenter
.webp)
Toggle Glow to subtly cue presenters with a soft light — no disruption to the audience.
.webp)
Elapsed Timer at the bottom runs independently of your session timers — useful for tracking totalrehearsal or show length.
Together, these widgets provide a full command center for managingsessions, keeping speakers informed, and ensuring your event stays ontime.
On-Cue: Built-In Assistant Director
The On-Cue feature helps you attach production cues — lighting changes, sound bites, camera switches, and stage moves — to specific timestamps in your session. Set reminders so your crew never misses a cue.
.webp)
Select the On-Cue icon in the control panel.
.webp)
Create a cue by selecting a session, clicking Add Cue, entering a description and time, choosing a reminder, and saving.
.webp)
Set reminders 30 seconds before each cue to give your crew time to prepare.
.webp)
Search for cues by typing a keyword into the search bar to instantly filter your cue list.
.webp)
Edit or delete a cue by clicking on it to make changes, using the trash icon to remove one, or choosing Clear Cues to delete all cues in the session.
.webp)
During a show, On-Cue shows a notification on your control screen at the chosen reminder time — the speaker never sees it.
General Settings
.webp)
Global Flash Settings
Choose when the timer starts flashing and for how long (applies only to newtimers. Previously established timers will not take the global settings).
.webp)
Upload CSV
Import templates of timers and messages for faster setup.
.webp)
Disconnect
End the link to CueTime screens; timers remain saved.
.webp)
Delete All Sessions
Clear your entire show to start fresh (cannot be undone).
.webp)
Generate View-Only Code
Share live countdown view (read-only, online mode only).
.webp)
Shut Down Screen
Remotely power off the CueTime screen from the app.
(Not currently supported.)
Logs & Activity Feed
Your CueTime™ Display keeps a live log of activity, color-coded for quick tracking
Red = Disconnections
Green = Connections
Yellow = Messages (heartbeat/discovery pings)
Blue = Timer events
.webp)
.webp)
Power Inputs:
TrueCon (locking connector) OR IEC (standard power cable)
Use only one input at a time. Never connect both TrueCon and IEC simultaneously
Power over Ethernet (PoE):
Connect the PoE port inside the enclosure to the screen. Use a PoE injector/switch with sufficient power. PoE only powers the CueTime screen, not TVs or other devices
Cable Management:
Route cables underneath the enclosure and up through the cut-out opening for aclean setup and to prevent tripping hazards.
Shutdown & Care
Always shut down the CueTime™ screen after use — do not just unplug power.
How to shut down
.webp)
Swipe up from the bottom of the screen to display power icon.
.webp)
Tap power icon and select “Power off”
Safety
- Use only approved power adapters.
- Keep away from liquids and extreme heat.
- Do not block ventilation.

.webp)
.webp)